Monday, November 29, 2010

WEATHER PROJECT


WEATHER-
the state of the atmosphere with respect to wind, temperature, cloudiness, moisture, pressure, etc.The term is very broad and may include definitions beyond the one presented here. Please consider all possible definitions as it pertains to the atmosphere, actions caused by the atmosphere, etc.

Below are examples of various artist whose work encompasses the concept of weather or a similairity to the concept.


Walter DeMaria


James Turrell


James Turrell


Mark Rothko


Jackson Pollack


Julie Mehretu


James McNeil Whistler


Turner


Claude Monet


Claude Monet


Vija Celmins


John Constable

Inspiration from the concept of weather can be diverse, from the trace of weather on the landscape, to the photographic documentation of the temporal, to the prognastication technology, to the forecast format.


Consider a statistical , a atmospheric/ psychological, diagramatical, or documentary perspective. Examples might include: an almanac, weather on your date of birth, recording the weather for 10 days, a singular tree documented through various weather, weather affecting the city, weather changing the pyschological feeling in one location, radar images, storm tracking etc.

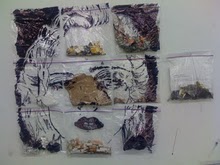
The first step in this project is to gather inspiration. With the ten zip- lock bags you have been given, collect inspirational samples. May include sketches, a drawing a day of a particular tree, photos, newspaper clippings, charts, a weathered stone, articles, leaves, recording tide marks, etc. Try and stretch out your normal mode of brainstorming. Remember, the final artwork must be a drawing- it is up to you to decide the format, location, materials, to best express your idea.

Student Work

Student Work

Student Work


Student Work

Student Work


Wednesday, November 17, 2010

IDEATION INTRODUCTION

So far students have developed the skills, sensibilities and competencies that allow them to objectively view, analyze, and represent three-dimensional reality through the practice of drawing. Now they are equipped to apply this knowledge into the realm of the imagination. In this open-ended exercise students will work with the instructor and propose their own individual project program and work plan. This is the first opportunity to apply their knowledge of drawing practice and conventions, in a more creative manner. The standards of evaluation will be tailored individually and determined by the success in accomplishing the particular project objectives as agreed by student and instructor.


In this portion of the course we will explore the process of inspiration and concept, method, and finished drawing. Through this process the goal is to expand the boundaries of drawing while seeking to find personal voice. Below are several examples of artists approaching drawing and ideas from different perspectives.


Mark Lombardi

Marl Lombardi


Robert Rauschenberg


Cia Gou- Qiang

Dane Patterson

Dane Paterson


THE LAST PERSON ON EARTH

EXTINCTION-In biology and ecology, extinction is the end of an organism or of a group of organisms (taxon), normally a species. The moment of extinction is generally considered to be the death of the last individual of the group (From Wikipedia)

Our project is to use this theme in regard to the human race. What would it be like to be the last person on Earth? What would it mean to be the last example of the human race? Is it a post- apocalyptic environment? Do you try and prolong your life by any means necessary? Is it a cosmic Joke?

There are multiple ways to approach this theme. Some inspiration in movies and art are below.

Book of Eli Click here

I Am Legend click here

The Road click here

Dana Shutz, a contemporary artist create a series of painting about this topic. You will notice a distinctive voice or perspective in regards to this theme of a person all alone. Click here to see images

Monday, November 15, 2010

SKULL and HEAD


The skull provides the basis for understanding the form of the head. The three large masses of the head are the cranium, the skeleton of the face and jaw. Consider the forms of these masses simply. The cranium as a sphere, the face as a flat plane that descends off the cranium and tapers toward the chin and the jaw as a horse shoe shape that hinges underneath. Notice where the skull protrudes to provide landmarks, where it recedes under the flesh. (Following two examples are from Szunyoghy's Human Anatomy for Artists)


The profile of skull. Notice the ear hole location, not centered but 2/3 of the way toward the back. Also see how the head rests slightly forward on the neck.

Below we have an example from Bridgman's Constructive Anatomy. Here he illustrates some of the muscles in the head. Good to consider as for developing from and gesture in the face.


BEGINNING THE CONSTRUCTION OF THE HEAD


In the construction of the head, it is better to begin with a cube in stead of the familiar oval. The oval is non -specific, the eye won't rest on a curve and cannot find a register point. The cube gives a sense of mass, perspective, foreshortening, angle/ tilt. Also importantly, it gives a sense of the third edge. From this starting point we can begin thinking of planes as they relate to the head - top, front, two sides, back, and bottom.

The basic measurements for the cube are 2/3 wide, 3/3 high. The side of the cube (profile) is 7/8 of the height. ( From the profile it looks ALMOST square, from the front (face) it is a tall rectangle.)


The basic proportions and location of the facial features can be constructed as the example demonstrates (Example is from the website Draw23.)

-A Vertical Line down the center from top of head to chin. Through this line we see the Bilateral Symmetry of the features.

-A Horizontal Line is placed at the halfway point. This indicates the lower lids of the eyes.

- The whole height can be again divided, but this time in thirds. The upper horizontal line indicating the middle of the forehead, the second the base of the nose. In the bottom third, two thirds of the way up to the nose is the center line of the mouth.

- The corners of the mouth line up vertically with the center of the eyes.

- The top of the Ear lines up horizontally just above the eye at the eye brow.

-The bottom of the ear lines up with the base of the nose.

Most of these guidelines can be drawn in on the cube, allowing you to place the head spatially and in perspective.


Below we see an example from Bridgman's Constructive Anatomy demonstrating the planes in the head. These are very basic, but a good way to begin to refine your head form.

Below is an example from Szunyoghy's Human Anatomy for Artists. It further illustrates some of the agreed upon proportions in the head. Included are the space between the eyes equals one eye width. The whole width of the head is five eye widths. Also illustrated is the top and bottom of the ear as they relate to the eye brow and nose (good marker). The width of the nose is also illustrated to be approximately the space between the eyes.


IMPORTANT NOTE*- All these proportions were largely agreed upon during the Renaissance, and are considered guides, not hard and fast rules. they do not necessarily account for the variation of people, races, ages, etc.

Below is another Bridgman example providing some insight into the neck and head the muscles track and connect with the skull. Of particular note is the Streno -cleido- mastoid (#8) a great reference point in figure drawing, spanning from the clavicle to behind the ear.


Student Example

Student Example

Student Example

Wednesday, October 27, 2010

VALUE SCALE

Value scale refers to the gradual movement from Black to Gray to White. A value that is on the upper portion of the value scale is known as being “high key.” And a value that is located on the lower portion of the value scale is known as “low key.”

Arrangement of the these values, their quantities, and their shape can indicate light direction, intensity, and object tactility. A value scale drawing is bound by the number of values chosen, the more chosen, the more accurate the representation.Within a value scale drawing, boundaries between individual shape are left. This allows the value gradation to be seen clearly. It yields a graphic representation of the object.

Value scale- low to high.


A Value Finder- a tool to assist in discerning a true isolated value amidst many. This tool allows the viewer to locate the value within the viewing hole and see it unaffected. Within most complex value relationships of a subject, there is a lot of simultaneous contrast, and fluting making it difficult to see accurately. This Vale Finder is about a 5 on the Value scale- middle.


A simple cup with illumination from the left.


The same cup rendered into a 9 value scale representation. Notice the gradations along the cylinder base. Each value has shape and is progressively darker than the one to its immediate left, allowing the gradation to be seen. The gradation also informs the viewer to the surface of the object. In this case the side of the cup is smooth and curved. The rim of the cup shows a stark transition from interior light to exterior dark, this shows the surface has a dramatic plane shift. Placement, shape, and quantity, indicate how the light is falling over the surface.


This is a representation of the value scale drawing as outlines or boundaries. Value is what gives light information and adds to form.